How To Build A Dresser From Scratch
Learning how to build a dresser from scratch can benefit your life. If yous simply take i slice of article of furniture in your bedchamber bated from your bed, let it be a dresser. A dresser isn't just for dress. It can agree annihilation that you want it to and can be shared by multiple people.
How To Build A Dresser Tutorial
 View in gallery
 At present, this tutorial will take you through the steps to build a dresser but it isn't necessarily for beginners. The tutorial isn't groovy for a first project. You lot will need a little flake of experience before building this dresser.
What You'll Need to build a dresser:
Before getting started, you need to cut all of your boards. It is easier to take all of your pieces ready than to cutting each board as y'all demand it. Hither is a listing of every lath that you need, cut to size already.
Wood For Frame
- iii/four″ thick project panels or 3/four″ plywood: 2 (2) 16" ten fifty-1/4" for the sides. Three (3) xvi" x 29-3/four" for the interior horizontal supports. Two (2) 16" x viii-1/4" for the interior vertical supports. 2 (2) 16" x 31-1/iv" for the top and lesser.
- 1×2 lumber: Four (4) cut to 29-3/iv". Four (4) cut to 21-1/ii".
Wood For Drawers:
- 1×6 lumber: Twelve (12) cut to 14". 4 (4) cut to 5". Eight (eight) cutting to 27-ane/four".
- 1×3 lumber: Eight (8) cutting to 14". Viii (eight) cut to xix".
- 1/4″ plywood: Four (four) cut to 14" 10 20-1/2". Four (4) cutting to 14" x 28-3/four". Two (2) cut to 14" x 6-ane/2".
Woods For Drawer Faces:
- ane×4 lumber: Four (4) cut to 21-1/4".
- 1×8 lumber: Ii (2) cut to 8". Four (4) cutting to 29-1/2".
Actress Materials:
- Right angle clamp + regular clamps
- 1-one/4" pocket screws
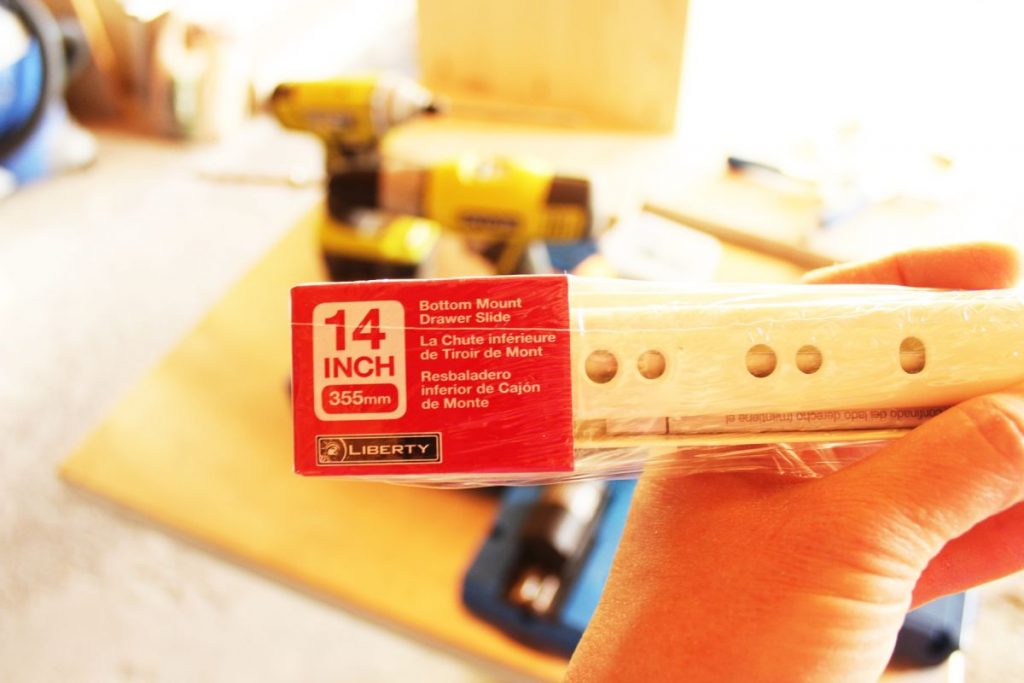
- 10 (10) sets of fourteen" European style bottom corner mount drawer slides
- Wood glue
- 5/8" and 1-1/4" brad nails + nailer
How To build a dresser – step past step tutorial guide:
Stride 1: Plan The Dresser
 View in gallery
 Before y'all brainstorm, information technology's important to program everything out. First, find out how big you want your dresser to be. Draw out a dresser first. Then turn it into a plan past adding measurements that will actually work.
You can get help from someone with experience if y'all can discover someone to aid. Or y'all can utilise some other dresser to re-create. You can find dresser plans online or simply measurements which yous can use as plans.
Step two: Label Your Pieces
 View in gallery
 Start off, you desire to label all of your pieces. Write on them which direction they go, which slice they are, and and so on. You can always sand out whatsoever writing afterwards so experience free to write every bit much info as you want.
The more info, the fewer mistakes you lot may brand. You lot can even write total paragraphs with marks for screw holes and hardware at this point. It all depends on how detailed your plans not how much you volition remember.
Step 3: Marker Your Console
 View in gallery
 Taking 1 of the l 1/2″ panels, yous demand to mark all of the lines on your inside side panel for horizontal supports. This is where you volition use the sketch of your plans to find all of the correct measurements.
 View in gallery
 Always utilize a square to get straight lines. If you don't take a square, buy one. They are universal and definitely worth information technology. You can get a standard foursquare for cheap or pay a flake more than and get the useful quick square.
 View in gallery
 It's also of import to put x's on which side will be the meridian. Trust us, this is easy to go confused virtually later. You may recall you volition remember just after so many measurements and marks, it can get very disruptive.
Step 4: Add Pocket Holes
 View in gallery
 At present, you lot need to take your 29-3/4" panels that will offer horizontal support. It's fourth dimension to add pocket holes in them. Pocket holes are diagonal holes that are easy to cover up and can be drilled at an bending.
 View in gallery
 Have your 2 smallest project panels and add pocket holes to them as well. Add the holes to the longer side of these curt panels. It can be tricky to drill pocket holes without a clench simply you lot get used to it.
 View in gallery
 Step 5: Mark Your xxx″ Panels
 View in gallery
 Take one of your 29-3/four" panels and identify it pocket-pigsty-side-down. And then describe a line that is 7-1/2" from one side. Place your Xs on the far side of the line. Do the same for the other one and mirror it.
How To Build A Dresser – Steps 6-x
Step 6: Mucilage First Board
 View in gallery
 With the pocket holes facing the short cease, place an 8-i/4" panel onto the line of your 29-three/4" slab. If it seems right, then add wood glue to the shortboard and identify information technology back over again. This is the exciting start mucilage!
 View in gallery
 Afterwards y'all glue it downwards, then you can clench it and screw it downward. Screwing at this signal is like shooting fish in a barrel with a drill. Just use the holes you made to drill the screws in. Don't become as well far in, simply enough that you experience resistance.
Step vii: Add First Drawer Slide
 View in gallery
 Information technology may seem odd to add together drawer slides at this point, but it is best to start them now for a couple of reasons. First of all, information technology's nice to have a visual and 2d of all, it is impossible to do and then subsequently you comprehend the surface area up.
 View in gallery
 Accept a 3/4 inch board and brand a mark that far in from the terminate of the dresser. And then, take the 14" European lesser corner mount drawer slides and install the start one to this corner you've just made.
Footstep 8: Install Other Slide
 View in gallery
 At present, take that other 50-1/iv" console that you already marked. This will be the other side of the dresser. Using the xv-3/4" mark, you can install the other side of the drawer slide simply like you did the first one. Make sure it all mirrors.
Step 9: Attach Support Slab
 View in gallery
 In order to attach the top horizontal support slab, you need to use either a screwdriver or a long drill chip. A drill won't fit and if yous practise get the bit on the screw caput, it won't be straight and will ruin the supports.
 View in gallery
 You tin can use the extra viii-1/4" slab to hold up the big slab while you piece of work on it. Having someone help is prissy but fifty-fifty if you do, having the right amount of peak on the terminate can just he done with some other board.
Stride x: Cease Master Horizontal Supports
 View in gallery
 Using the not-pocket-hole side of the tertiary 29-three/4" slab, measure and mark vii-1/two" in from the right side. Mucilage the second 8-1/four" slab onto the far side of the line and spiral them in. Attach the slides as done before.
How To Build A Dresser – Steps 11-fifteen
Stride xi: Attach More Slides
 View in gallery
 On the long right side slab, attach the drawer slide using the 3/4 board technique at the 8 three/4″ line. You desire that 3/4″ similar everywhere a drawer is going to be. Without it, you finish up with protruding drawers.
 View in gallery
 While you're at this, you can drill 3 pocket holes onto each interior cease (top and lesser) of your two side panels. Brand sure they are on the interior or else everything else will be off and you will have more to clean up.
Stride 12: Adhere The Slabs
 View in gallery
 Now it's fourth dimension to attach the tiptop and lesser slabs to the sides. So get your strong wood glue and add together gum to the lesser of the side slab. Then let information technology set for a infinitesimal clamped and add together the pocket screws.
 View in gallery
 Do the same for the other side. If you can get help to agree these upward while you glue and screw then please practice so. Make sure the corners are square before you lot adhere the top slab to the meridian of the dresser.
 View in gallery
 Step 13: Secure Horizontal Support
 View in gallery
 Slide your horizontal support boards into the frame ensuring everything is facing the right way. At present y'all can secure the pocket screws! This is exciting because the dresser actually starts to come into focus.
 View in gallery
 Use a screwdriver to secure and of the pocket screws that the drill cannot reach. This is time-consuming, but brand sure that you screw them in good and directly. Y'all tin clench them down to make sure that they are tight.
Stride fourteen: Attach Decorative Supports
 View in gallery
 These 1x2s supports don't offer whatever support but they are going between the drawers and offer a facing for the dresser. Without them, the dresser would look hollow when the drawers are installed even when airtight.
 View in gallery
 So drill holes into each lath and secure them all.
Step 15: Check The Frame
 View in gallery
 Now the main frame is washed, which is also super heady! You tin set the dresser up and cheque that everything is stable and square. You may also add covers for the pocket holes at this point if you similar.
 View in gallery
 Now, you can buy those covers at most hardware stores. They are called pocket pigsty plugs and they are relatively cheap for a large amount. You lot tin too make your ain just that is very time-consuming.
How To Build A Dresser – Steps 16-20
Step 16: Finish Slides
 View in gallery
 At present it's fourth dimension to end installing all the drawer slides on your frame. Yous should already have these lines marked. Then, install all of the drawer slides, ensuring you accept the 3/iv″ space behind every i of them.
Step 17: Build The Drawers
 View in gallery
 It'south finally time to build the drawers! Each drawer will be attached with the front end and back faces between the ends of the 14" side boards. And then drill ii pocket holes per side of each front and back board.
 View in gallery
 Using the same pocket hole technique as e'er, build your first drawer. Then go on until all of the drawers take been congenital. You lot can build as many as you desire and whatever size that you want for your dresser.
Step 18: Attach Bottoms
 View in gallery
 After the drawers are all built, make certain they all fit into the slots correctly. Attempt each and every 1 of them before getting fix for the adjacent step. Adding the bottoms to the drawers! This volition support your items.
 View in gallery
 Using 1/four″ plywood, adhere the bottoms to the drawers with glue. Then use a nail gun to secure the plywood. This procedure is very simple and difficult to mess upwards. You tin use a hammer instead of a blast gun if you be careful.
Pace xix: Attach Slides
 View in gallery
 This part is fairly self-explanatory. You want the drawer to be sunken the same amount equally the width of the face boards. This is more often than not somewhere between 1/2″ and 1″ but tin be almost whatever width.
 View in gallery
 Attach all of the mounts and all of the drawers until you lot have the complete base and skeleton of the dresser done. This may be the all-time part of the project because the whole matter comes to life in forepart of your optics.
Step 20: First Building Faces
 View in gallery
 Make certain that the faces fit perfectly. In that location should exist about a 1/8" gap effectually all sides. And so lay the face downward below the drawer and marking the position of the vertical part of the drawer slide. This volition aid you align the drawer face up perfectly onto the drawer itself.
How To Build A Dresser – Steps twenty-24
Footstep 21: Glue Faces Downwardly
 View in gallery
 At present information technology's finally time to start making the drawer faces. Pull out each drawer and add glue, i at a time. Clamp each drawer face down every bit you get. Then boom each face up down. Keep going t it until all the faces are secure.
 View in gallery
 When you cease, the drawers should slide in and out with the face affluent with the dresser. Go ahead and attempt them a few times because there isn't anything more than satisfying than seeing your project role.
Pace 22: Sanding
 View in gallery
 At present it's time to start sanding downwardly the dresser to go it smooth and splinter-gratuitous. This is an like shooting fish in a barrel and calming part that tin hardly exist messed upwards. Just use fine-grit sandpaper and sand the unabridged thing down lightly.
Step 23: Have Care Of Imperfections
 View in gallery
 If in that location are any imperfections or knots, you lot probably desire to utilize woods filler to gear up them. Learning to utilize forest filler is easy and tin can actually make a huge departure so try not to skip this step. Fifty-fifty for a farmhouse or vintage look.
 View in gallery
 After the woods filler dries, lightly sand it downwards. Don't sand the wood filler abroad. Instead, lightly sand only the parts that you added wood filler to in society to remove any excess putty that got out of hand.
Step 24: Paint
 View in gallery
 Now it's time to either paint or stain. Nosotros take a total tutorial on painting a dresser that yous tin can follow along to. After y'all paint, you can add hardware, and you are done! Time to relish all of your hard piece of work.
 View in gallery
 For this detail dresser, we too added some legs that are metal instead of wooden. Overall, the projection turned out perfectly! Feel free to make changes if you have experience with building piece of furniture and let us see your masterpiece.
FAQs About How To Build A Dresser
Learning how to build a dresser from scratch can be washed in a few ways. These FAQs can aid you lot find out how.
How Practice Yous Build A Dresser Without A Tutorial?
Y'all tin can build a dresser without a tutorial by using tutorials as your base of operations. Later you acquire the basics of what a dresser looks like, you can create your own patterns. Build a dresser frame and build the drawers.
Can You Build A Dresser That Is Make-Name?
You tin't build a brand-proper name dresser but you lot can build a copycat. Take a wait at each piece of the dresser you are interested in. Then, build each piece and secure them. Building a copycat dresser is an affordable manner to get the dresser of your dreams.
What Tin Y'all Build A Dresser Out Of?
You tin can build a dresser out of anything. Woods is the near pop option, but plastic works. So does glass, metal, and stone. Wood is the easiest to work with but you can build a dresser out of annihilation that you lot feel comfortable using.
Can Yous Build A Dresser Out Of Pallets?
Yep. A pallet dresser is a good manner to use extra pallets and get a cool dresser. To build a dresser out of pallets, stack the pallets to ensure you will have plenty. And so, accept the project stride by pace.
Source: https://www.homedit.com/how-to-build-a-dresser/
Posting Komentar untuk "How To Build A Dresser From Scratch"